Start Here (Copy)
Step 1 - Choose a Store Name
Picking a name is important but don’t spend too much time on it. Think of something random and simple. Once you’ve come up with some ideas for the name of your Shopify dropshipping store you’ll need to check if it’s available. A useful tool for coming up with an eCommerce store name is the Shopify Business Name Generator.
You can check this by using Google search, and also searching if there is a .com domain which is already being used.
Step 2 - Create a Shopify Store
Create your eCommerce store in just a few clicks and all of the server setup and maintenance is taken care of for you. Go to Shopify.com, click 'start your free 14-day trial', enter your store name, and create your shop.
Next you’ll need to fill out a couple of details about your store, your experience with ecommerce, and your personal details.

Step 3 - Optimize your settings in your Shopify store
You're going to go through the settings of your newly created Shopify account. This step is essential so you can receive money from your customers, create your store policies, and establish your shipping rates.
3.1. Add Your Store Payment Option
Add your PayPal email address under Shopify Settings > Payments Section. Later, you can change, remove, or add additional payment options.
If you don’t have a PayPal account, register at PayPal.com. It will take about 5 minutes.


3.2. Generate Required Policies
Shopify offers a handy tool for generating terms and conditions, standard privacy, and return policies. Just go to Shopify Settings > Checkout > scroll down to Refund > Privacy > TOS statements section to generate each policy sample.
3.3. Add Free Shipping Rate
The sourcing tool I recommend will offer most of the products with a free delivery option. I suggest adding a free shipping rate for all of your orders, as well.
Go to Shopify Settings > Shipping and delete all shipping zones that are “Domestic,” and under the “Rest of World’ select ‘Free International Shipping’ under ‘Price based rates.’ Don’t forget to check off “Rate: Free shipping rate.”


3.4. Create an Online Store
Shopify allows you to sell your products across multiple channels like Online Store, Facebook Store, Brick & Mortar store, etc.
Right now, we want to create an Online store. Go to Shopify Settings > Sales Channels and add Online Store as your sales channel if it hasn’t been added automatically.
3.5. Buy a domain (optional)
Buying a domain is optional but recommended. Currently, your URL looks like this: [storename].myshopify.com. You might want to change it to look more like a standard website: [storename].com.
To buy a domain, go to Shopify Online Store > Domains Section > Buy New Domain.
P.S. You’ll need to confirm the domain before it starts working. The confirmation email is in your email inbox.

4) Add Products and Categories
Use this text to share information about your brand with your customers. Describe a product, share announcements, or welcome customers to your store.
Dropshipping allows people who are just figuring out how to start ecommerce store to get started quickly so that they can spend more time and energy on generating sales. With dropshipping, you aren’t required to hold any inventory and don’t need to ship, which also saves you time and money.
Simply add products to your eCommerce store, and when an item sells, pay the supplier who then ships it directly to your customer. There is no need to pay for extra storage space and no need to worry about what to do with unsold stock.
Contact a wholesaler and land a dropshipping deal. You will soon realize that it is hard to find good suppliers who provide dropshipping services. If you find a company, they usually do business only with established, profitable businesses. This is not the best option for a new startup business. Use sourcing tools and apps. Connect your eCommerce store with the app (see recommendation below) and import products directly from a dropshipped products database within minutes.
There are several dropshipping apps, but I would suggest downloading the free trial from Oberlo. Oberlo is an app that allows you to import dropshipped products from AliExpress to your eCommerce store within minutes. Items sold in your store will be shipped directly to your customers in just a few clicks. AliExpress offers a wide variety of products at very low prices, which is why it is an ideal partner in the beginning when you launch your store.
Here’s how we’ll use it:
1) Create categories
Product categories are called collections on Shopify. If you’re selling women’s jewelry your collections will be (from top to the bottom): Earrings, Rings, Necklaces, Watches, Bracelets, etc.
Just go to Products > Collections > Add New Collection > enter your collection name and select your collection conditions.


2) Install Oberlo app and add products
Adding products with Oberlo is simple. The video below shows me installing the Oberlo application from Shopify App Store and importing a products to my store.
When it comes to selecting products for your store, choose products based on high order volume, high star rating and shipping costs. For order volume, anything over 30 orders with a high star rating is fine. You just want to ensure that other people have been happy with their purchases. When it comes to star rating, 4+ only. You want to ensure that people are happy with the quality and manufacturer. When it comes to shipping costs, if free shipping is offered great but if ePacket is offered you can provide your customers with faster delivery times.
5) Add Content
Content is extremely important. This is an area where you should devote your focus on and spend more time on in the future. For now, the following sections should be enough to start with: About Us, Terms and Conditions, Privacy and Returns Policy, Shipping & Delivery Information, Track Your Order link, Contact Us.
1) About Us
When you write an About Us page, make it personal. Tell a story about why you started the brand. Show pictures of yourself to show that there’s a human behind your eCommerce business.
2) Shipping and Delivery Information
Most of the sellers on Oberlo have very similar delivery prices and timeframes, so it is best to copy and paste this standardized shipping & delivery page
3) Terms and Conditions
You may remember that these pages were generated during the first step of this tutorial. Simply copy them from your settings page and paste into separate articles.
4) Contact Us

6) How to launch a Shopify store: Design Your Store
Mastering design is an important part in the process of creating an ecommerce store. How you present your eCommerce business helps build trust with customers. Thankfully, Shopify automatically assigns a default theme to your eCommerce store and it already looks great, so you do not need to change this unless you want to spend the time to customize it. A customized site can help enhance your brand, but it is not necessary to do that when first launching the store.

Don’t buy a new theme until you’ve generated enough sales for it to be paid for through your eCommerce business. There’s no need to make big purchases in the beginning. You can still create a beautiful website through your banner graphic, color scheme and other visual elements.
1) Create Menu/Navigation
Go to the Shopify Online Store > Navigation section > select edit ‘Main Menu’ card and list all your collections there.
2) Upload Main Banner
You can create a cool looking banner in just a few minutes. Use Google ‘banner editing tools’ or click here: Canva.com. Select banner dimensions (1200x360px), upload an image of one of your products, select background, insert a few lines of text, add a ‘Buy Now’ button, and you’re finished.
You can also use Canva’s templates to design something visually appealing. They have shapes you can incorporate into your design to make things pop. Don’t be afraid to look through Canva’s templates for inspiration to design a banner that wows. Their website is user-friendly and allows even someone with little design experience to create a unique banner.

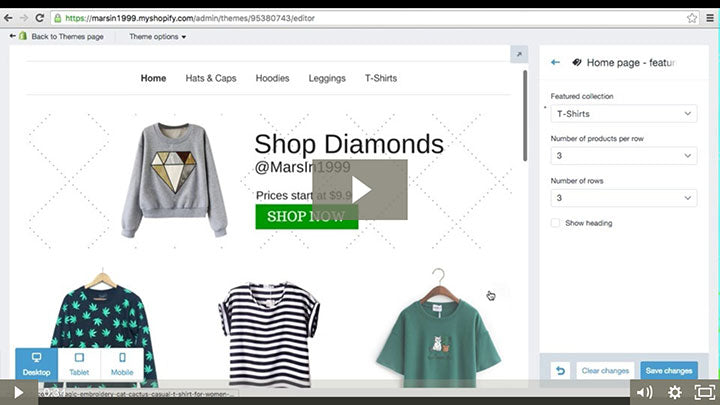
3) Editing Featured Products
4) Setting up your Footer
You can find Footer Settings in Online Store, Themes Section, Customize Theme page, and Footer Settings. There you can decide what you want to see in your footer menu. I usually hide ‘Latest News column’, because we haven’t created any blog posts yet 🙂
Congratulations
Congratulations, you have just launched your first eCommerce store!
Know that you’ve only figured out how to start an ecommerce store, now you need to figure out how to take it to the next level. Owning an eCommerce business is about trying to improve your sales, customer service, customer experience, and most importantly, yourself.
To create a successful eCommerce store, you’ll need to focus your energy on marketing your store via ads, content creation and building an audience on social media.